ဖိုးသာေအာင္ BLOG မွေႏြးေထြးစြာ ၾကိဳဆိုပါတယ္

Photobucket

Sunday, October 28, 2012

ကြန္ျပဴတာ မွ ဖုန္း(ဖုန္း မွ ကြန္ျပဴတာ)Free phone call & free message

အသိပညာ မ်ားကို လက္ဆင့္ကမ္းမွ်ေ၀ ေပးျခင္းျဖစ္ ဒါနျပဳပါရေစ။

က်ေနာ္တို႔ ဖုန္း To ဖုန္း ။ ဖုန္း To ကြန္ျပဴတာ ။ ကြန္ျပဴတာ To ကြန္ျပဴတာ နဲ႔ ကြန္ျပဴတာ To ဖုန္း ေတြကို  Viber Software သုံးျပီး တကမၻာလုံး Free Call & Free Messages ေတြ ပို႔လို႔ ရေနပါျပီ
ဖုန္းထဲကို Viber free call & massage ထည့္နည္း ကို တင္ထားျပီးပါျပီ
အခု က်ေနာ္ တင္ျပခ်င္တာက ကြန္ျပဴတာမွာ Viber software ထည့္နည္းေလးပါ
(1)ပထမဦးဆုံး ကြန္ျပဴတာထဲကို bluestacks App player ကို အင္စေတာလုပ္ရပါမယ္။Bluestacks ကို ရယူဖို႔အတြက္ ဒီေနရာ ကိုနိွပ္လိုက္ပါ။ဒီမွာ လဲေဒါင္းယူလို႔ရတယ္
ေဒါင္းျပီးရင္ ကြန္ျပဴတာမွာ အင္စေတာလုပ္လိုက္ပါ ျပီးသြားရင္ (2)Desktop ေပၚမွာ ဒီပုံစံ icon  ေလးကို ကလစ္နွစ္ခ်က္နိွပ္ျပီး run လိုက္ပါ Bluestacks app player window ပြင့္လာတဲ့အခါ ေအာက္ပါအတိုင္း ဆက္လုပ္သြားပါ
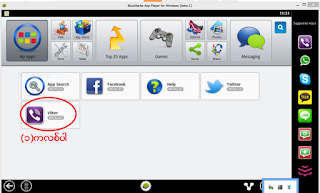
(၁)My Apps ကိုနိွပ္ (၂) Apps search ကိုနွိပ္ပါ
(၃)search box မွာ viber လုိ႔ရိုက္ျပီး Find ကိုနွိပ္ပါ
(၅)viber:free call& messages ေဘးက install ဆိုတာကိုႏိွပ္ေပးလိုက္ပါ
(၆)ေအာက္ပါပုံအတိုင္း viber ကို အင္စေတာလုပ္ေနတာကိုေတြ႔ရမယ္
(၇)အင္စေတာလုပ္ျပီးသြားရင္ search box ရဲ့ window ကိုပိတ္လိုက္ပါ
(၈)My Apps ကိုႏွိပ္ၾကည့္လိုက္ရင္  အင္စေတာလုပ္ျပီး တဲ့ viber icon ကို ေတြ႔ရမွာျဖစ္ပါတယ္
viber ကို bluestaks player ထဲမွာ အင္စေတာလုပ္ျပီးရင္ အသုံးျပဳနိုင္ဖို႔အတြက္ register လုပ္ရဦးမွာျဖစ္ပါတယ္ register လုပ္ဖို႔အတြက္ ဖုန္းနံပါတ္ ေပးရပါမယ္ က်ေနာ္ကေတာ့ အိမ္ဖုန္း(land line)ဖုန္းနံပါတ္ကို ထည့္ေပးလိုက္တယ္ လုပ္နည္းကေအာက္ပါအတိုင္းျဖစ္ပါတယ္
(၁) အင္စေတာလုပ္ထားတဲ့ viber icon ေလးကိုကလစ္လိုက္ပါ ေပၚလာတဲ့  ၀င္းဒိုးမွာ continue ကိုနိွပ္ပါ
(၂) OK ကိုနိွပ္ေပးလိုက္ပါ

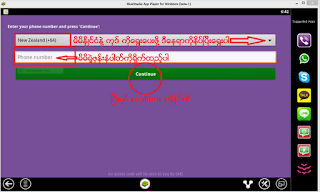
(၃)လက္ရွိမိမိေနထိုင္ေနတဲ့ နိုင္ငံရဲ့ ကုဒ္ကိုေရြးေပးျပီး ဖုန္းနံပါတ္တစ္ခုုကိုထည့္ေပးပါ 
ျပိီၤးရင္ေတာ့ continue ကိုနိွပ္ေပးလိုက္ပါ

(၄)Approve ကိုနိွပ္ေပးလိုက္ပါ
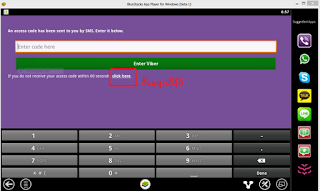
(၅)text message ရတဲ့ဖုန္းေတြဆိုရင္ ဖုန္းmessage မွာ code နံပါတ္ေလးလုံးေပးထားတာကိုမွတ္ျပီး Enter code here ေနရာမွာ ကုဒ္နံပါတ္ကိုထည့္ျပီး Enter viber ကို ကလစ္ေပးလိုက္ပါ။ က်ေနာ့္အိမ္ဖုန္းက text message မေပၚတဲ့အတြက္ click here ကိုနိွပ္ေပးလိုက္ပါ။
(၆) ေပၚလာတဲ့ ၀င္းဒိုးမွာ Get code ကိုႏွိပ္ေပးလိုက္ပါ
ပုံၾကီးခ်ဲ႕ၾကည့္ခ်င္ရင္ ပုံကို  ကလစ္ေပးလိုက္ပါ

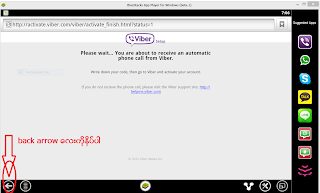
ဒီေနရာမွာ viber.com ကေန ဖုန္းေခၚလာျပီး ကုဒ္နံပါတ္ကိုေျပာေပးမွာျဖစ္ပါတယ္ ကုဒ္နံပါတ္ေလးလုံးကို ေသေသခ်ာခ်ာ မွတ္ထားပါ။


 ေစာေစာက
Enter code here ဆိုတဲ့ေနရာေရာက္ေအာင္ back arrow ေလးကို ကလစ္နိွပ္နွိပ္ ေပးလိုက္ပါ
(၇)Enter code here ေနရာမွာ ေစာေစာ ကမွတ္ထားတဲ့ ကုဒ္ ကို ထည့္ေပး ျပီး Enter viber ကို ႏိွပ္ေပးလိုက္ရင္ viber free phone call & messages ကို အသုံးျပဳလို႔ ရသြားပါျပီခင္ဗ်ား
(၈)key pad ကို ကလစ္ျပီး ဖုန္းနံပါတ္ ရိုက္ထည့္၍ call button ကို ကလစ္ျပီး  viber ထည့္ထားတဲ့ ဖုန္း(သို႔) ကြန္ျပဴတာ ကို စတင္ေခၚဆိုလို႔ရပါျပီ
ကြန္ျပဴတာမွာ (landline home phone)နံပါတ္ျဖင့္ viber ကို activated လုပ္ထားပါက
 (+နိင္ငံကုဒ္+ဧ၇ိယာကုဒ္+ဖုန္းနံပါတ္)အစဥ္လိုက္ထည့္ပါ
နယူးဇီလန္နိဳင္ငံအတြက္(ဥပမာ)        +၆၄၄၂၃၈၄၃၀၃(+လကၡဏာ အစား ၀၀ ကိုထည့္လဲရတယ္(ဥပမာ) ၀၀၆၄၄၂၃၈၄၃၀၃
Hand phone နံပါတ္ျဖင့္ activated လုပ္ထားပါက
(+နိုင္ငံကုဒ္+ဖုန္းနံပါတ္)ကိုအစဥ္လိုက္ထည့္ေပးရပါမယ္
နယူးဇီလန္နိုဳင္ငံအတြက္(ဥပမာ)      +၆၄၂၁၀၂၈၆၃၇၁၅(၀၀၆၄၂၁၀၂၈၆၃၇၁၅)
တစ္ျခားနိုင္ငံအတြက္လည္း ထိုနည္း၎ပါပဲ
မိမိကြန္ျပဴတာမွာ register လုပ္ထားတဲ့ဖုန္းနံပါတ္ ကိုေသေသခ်ာခ်ာ ျပန္မွတ္ထားပါ
ဒီဖုန္းနံပါတ္ဟာ မိမိကြန္ျပဴတာရဲ့ viber ဖုန္းနံပါတ္ ID ပဲျဖစ္တယ္
ဒီနံပါတ္ကို တစ္ျခား viber သုံးတဲ့ မိတ္ေဆြ တေယာက္ေယာက္ကို ေပးျပီး ျပန္ေခၚခိုင္းၾကည့္ပါ မိမိကြန္ျပဴတာမွာ လာေအာ္ပါလိမ့္မယ္ မိမိက call answer လုပ္လိုက္ရင္ ကြန္ျပဴတာ အခ်င္းခ်င္းျဖစ္ေစ ကြန္ျပဴတာနဲ႔ ဖုန္းနဲ႔ျဖစ္ေစ ဖရီးေခၚလို႔ရသြားပါျပီ
အထက္ကေဖၚျပထားတဲ့ဖုန္းနံပါတ္ဟာ က်ေနာ့္ကြန္ျပဴတာရဲ့ viber ID နံပါတ္ပဲျဖစ္ပါတယ္ ဖုန္းနံပါတ္တစ္ခု ကို ကြန္ျပဴတာ တစ္လုံးပဲ သုံးလို႔ရပါတယ္ ကြန္ျပဴတာ နွစ္လုံး သုံးလုံးမွာ ဖုန္းနံပါတ္တခုထဲ ကိုထည့္ျပီး activate လုပ္လို႔မရပါဘူး
အဆင္ေျပရင္ စမ္းသပ္ျပီးေခၚၾကည့္လို႔ ရပါတယ္
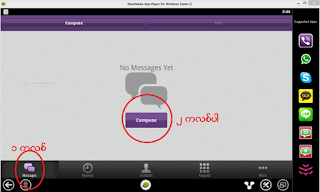
messages ေတြပို႔ခ်င္တယ္ဆိုရင္ေတာ့ messages button ကိုနိွပ္ျပီး compose ကိုကလစ္ေပးလိုက္ရင္ message ၇ိုက္ဖို႔ ကီးဘုတ္ေလးေပၚလာတဲ့အခါ ပို႔ခ်င္တဲ့ message သာေရးျပီး free ပို႔ၾကေပေတာ့ဗိ်ဳ႕
သိျပီးသားလူေတြ ေတာ္ေတာ္မ်ားပါတယ္ ဒီအေၾကာင္းကို အခိ်န္ကုန္ခံျပီ အေသးစိတ္ရွင္းျပေပးရတာကေတာ့ မသိေသးတဲ့ သူေတြကိုရည္ရြယ္ျပီး ရွင္းရွင္းလင္းလင္း သိသြားေစခ်င္လို႔ပါ   ကြန္ျပဴတာကို အင္တာနက္ ခ်ိတ္ထားဖို႕ေတာ့လိုတယ္ေနာ္ တကယ္ေတာ့နွစ္ဖက္စလုံး viber ကို အင္စေတာလုပ္ထားမွသာ အဆင္ေျပမွာျဖစ္ပါတယ္ 
contact list ထဲမွာ မိမိသူငယ္ခ်င္းေတြရဲ့ အမည္နဲ႔ viber ဖုန္းနံပါတ္ ID ေတြကို သိမ္းထား မွတ္ထား၇င္ အလြယ္တကူ ေခၚလို႔ရပါတယ္ 
contact list ထည့္နည္း
(၁) bluestacks player ကို ဖြင့္လိုက္ပါျပီးရင္ viber icon ကိုကလစ္လိုက္ပါ။
(၂)menu ကိုကလစ္ပါ

 
                                                   (၃)new contact ကိုကလစ္
            (၄)ေအာက္ကပုံအတိုင္း ျဖည့္စရာ ရိွတာကိုျဖည့္ပါ။ ကိုယ္ contact လုပ္မည့္သူရဲ့ အမည္နဲ႔ viber ID ဖုန္းနံပါတ္ ကိုအတိအက် သိဖို႔ေတာ့ လိုတယ္
                                 (၅)Invite to viber ကိုကလစ္ပါ
                                (၆)ေအာက္ကပုံအတိုင္း တိုင္းဆက္လုပ္ပါ
                                  (၇)contact list ထဲမွာ မိမိသြင္းထားတဲ့ အမည္စာရင္းေတြဟာအျမဲရိွေနမယ္
viber ဖုန္းေခၚခ်င္ရင္ ေဘး က viber ဖုန္း call icon ေလးကိုနိွပ္ေပးလိုက္ရုံပါဘဲ က်ေနာ္တို႔ phone book ထဲမွာ ဖုန္းနံပါတ္ နဲ႔ အမည္စာရင္းေတြ ထည့္သြင္းထားတဲ့ သေဘာပါပဲ  အားလုံးအဆင္ေျပၾကလိမ့္မယ္လို ႔ေမွ်ာ္လင့္ပါတယ္       အေသးစိတ္ တဆင့္ျခင္း ရွင္းျပတဲ့ ပုံေတြမ်ားသြားလို႕post က ေတာ္ေတာ္ေလးရွည္သြားပါတယ္

 
တစ္ခိ်ဳ႕ကြန္ျပဴတာေတြမွာ bluestack player ကို အင္စေတာလုပ္တဲ့ အခါ  java application ကို အရင္ run ခိုင္းတာမိ်ဳးေတြ႔ရတယ္   java လိုအပ္တယ္ဆိုရင္ ေအာက္မွာ ယူလိုက္ပါ
ေဒါင္းလို႔ java <<<<<http://www.mediafire.com/
အားလုံးအဆင္ေျပၾကပါေစဗ်ား


IDM နွင့္ Chrome ျပႆနာ

အသိပညာ မ်ားကို လက္ဆင့္ကမ္းမွ်ေ၀ ေပးျခင္းျဖစ္ ဒါနျပဳပါရေစ။
How to configure IDM extension for Chrome
တစ္ခါတစ္ေလ Chrome မွာ IDM ဟာ crash ျဖစ္သြားတတ္ပါတယ္ ဒီအခက္အခဲကို ေျဖရွင္းမယ့္နည္းလမ္းေလးက ေအာက္ပါအတိုင္းပါပဲ

Chrome Browser Integration

1. How to configure IDM extension for Chrome?
You need to press on Chrome menu (arrow 1 on the image), and select "Settings" menu item (arrow 2 on the image). Then select "Extensions" tab (arrow 3 on the image).


Check that "IDM Integration" extension is enabled (arrow 4 on the image). If you use incognito mode in Chrome, you need to enable "Allow in incognito" checkbox (arrow 5 on the image).
2. I deleted "IDM Integration" extension from Chrome by mistake. How can I reinstall it back?
You need to open IDM installation folder ("C:\Program Files\Internet Download Manager" by default), then drag and drop "IDMGCExt.crx" file into "Extensions" page opened in your Chrome browser:

Internet Download Manager, Tonec Inc. 641 Lexington Avenue, 15th fl. New York, NY, 10022 E-mail: info@tonec.com

© 1999-2008. All rights reserved.

Windows XP+Vista+7 တင္နည္းမ်ား

အသိပညာ မ်ားကို လက္ဆင့္ကမ္းမွ်ေ၀ ေပးျခင္းျဖစ္ ဒါနျပဳပါရေစ။
Windows Xp ,Vista and Windows 7 တင္နည္း ျမန္မာလို စာအုပ္ေလးပါ windows ကို ကိုယ္တိုင္ တင္တတ္ေအာင္ လမ္းညြွန္ေပးထားတဲ့စာအုပ္ေလးမို႔ ေဆာင္ထားသင့္တယ္ထင္လို႔ပါ  မသိေသးတဲ့သူမ်ားအတြက္ ရည္၇ြယ္၍ ဒီစာအုပ္ေလး ကို ျပန္လည္မွ်ေ၀ ေပးလိုက္ပါတယ္ ဒီ ၀င္းဒိုးေတြကို တင္တတ္သြားျပီဆို ရင္ windows 8 ကိုလဲ တင္တတ္သြားမွာ ျဖစ္ပါတယ္ အဆင္ေျပၾကပါေစ
ျမန္မာတက္ကနစ္ရွင္ဖိုရမ္ မွ ကိုေန ရဲ့ post ကိုလက္ဆင့္ကမ္းေပးလိုက္ပါတယ္
Direct Link<<<< http://forum.myanmar-technicians.org/index.php?action=downloads;sa=downfile&id=1

download Ebook<<<<windows XP+Vista+7 တင္နည္း >>>>

Windows 8 Manager

အသိပညာ မ်ားကို လက္ဆင့္ကမ္းမွ်ေ၀ ေပးျခင္းျဖစ္ ဒါနျပဳပါရေစ။


windows 8 manager ေလးပါ အားလုံးသိၾကမယ္ထင္တယ္္ ဘယ္လုိအသုံးျပဳရမလဲဆိုတာ
(၁)ဖိုင္ကို အရင္ေဒါင္းျပီး ဖိုင္ျဖည္လိုက္ပါ
(၁)setup file ကို Run လိုက္ပါ
(၃)antivirus ကို ခဏပိတ္ထားပါ
(၄)crack folder ကို ျဖည္လိုက္ျပီး C:/program file ထဲက windows 8 manager ဖိုဒါထဲကို copy and replace လုပ္ေပးပါ
အားလုံးအဆင္ေျပသြားမွာပါ
ေဒါင္းလို႔ဒ္လင့္ခ္<<<download>>>Here(ဒီမွာ)

ခ်က္နည္းျပဳတ္နည္း အဖုံဖုံ

အသိပညာ မ်ားကို လက္ဆင့္ကမ္းမွ်ေ၀ ေပးျခင္းျဖစ္ ဒါနျပဳပါရေစ။

Home >> Youth Section >> Cooking Corner

 ခ်က္နည္းျပဳတ္နည္း အမိ်ဳးမိ်ဳးကို ၀ါသနာပါသူမ်ားအတြက္ Link ေလးတစ္ခု ေဖၚျပေပးလိုက္ပါတယ္ သိျပီးသူေတြလည္း ရိွသလို မသိေသးသူမ်ား အတြက္ေအာက္ကလင့္ခ္ မွာ ၀င္ျပီးေလ့လာနိုင္ပါတယ္
၀င္ေရာက္ရန္လင့္ခ္<<<<<http://www.burmeseclassic.com/cooking_section.php

Saturday, October 27, 2012

Microsoft Office 2013 Professional Plus Full Version

အသိပညာ မ်ားကို လက္ဆင့္ကမ္းမွ်ေ၀ ေပးျခင္းျဖစ္ ဒါနျပဳပါရေစ။

Microsoft Office 2013 လိုခ်င္ရင္ေတာ့ ေအာက္ကလင့္ခ္ မွာ ေဒါင္းသြားပါ
{{{Office 2013 32bit Download Link}}} 


{{{{Office 2013 64bit Download Link}}}}
Serial Key{{{{ 46JNH-TM96J-GYW2K-G6C23-8K4C8 }}}}


 Who does not know with one of the most popular software in this world. Microsoft Office Professional Plus 2013 Preview. Yes, after Office 2007 and Office 2010 Microsoft today unveiled Microsoft Office Professional Plus 2013 Preview.

System Requirements:

    1 Ghz Processore (32 Bit or 64 Bit)
    1 GB of RAM (32 bit) or 2 GB of RAM (64 Bit)
    3 GB Hard Drive Space
    Operating System: Windows 7, Windows 8, Windows Server 2008 R2, Windows Server 2012
    Net Framework 3.5, 4.0, Or 4.5

In Microsoft Office Professional Plus 2013 Preview This difference is so striking in a more fantastic, because Microsoft Office Professional Plus 2013 Preview is indeed prepared for side by side with Windows 8, which will soon release. Here is How To Activate Office 2013 Preview, Read carefully:

    First you first install Office 2013 Preview
    * If you have Office 2007 or 2010, please uninstall it first
    After Install, Do not run the first Office 2013.
    Now we ask first series, do please read Step 4
    CLICK HERE to get Free Serial Number that you can use up to 5 users.
    Please LOGIN using your Hotmail or Live email
    * If do not have, please make one, just select the SIGNUP
    After that will come 'Microsoft Office Professional Plus 2013 Preview'
    The data contents - Then Continue - Wait a minute
    Serial works successful you get. Go to Step 9
    Run Office 2013 (It is up to Word, Excel, or Powerpoint) - Select the Blank Document
    Then the menu FILE - ACCOUNT - Change Product Key.
    Enter a Serial which you'd get - INSTALL

Friday, October 26, 2012

Microsoft Office 2010 Professional Plus 32&64bit

အသိပညာ မ်ားကို လက္ဆင့္ကမ္းမွ်ေ၀ ေပးျခင္းျဖစ္ ဒါနျပဳပါရေစ။
ေဆာ့ဖ္၀ဲကို ေဒါင္းျပီး  File Part-1 ကို Right Click နိွပ္ပါ ျပီးရင္ Extract Here ကို ကလစ္ေပးလိုက္ျပီး ဖိုင္ကိုျဖည္လိုက္ပါ။ WinRar ကိုအင္စေတာ လုပ္ထားဖို႔ေတာ့လိုအပ္တယ္
setup file ကို ကလစ္နွစ္ခ်က္နိွပ္ျပီး အင္စေတာလုပ္ပါ
ျပီးရင္ office program ကိုပိတ္ထား
office activator KMS ကို RUN ေပးလိုက္ပါ
အဲေမ့လို႔    မRUN ခင္ antivirus ကို Disable လုပ္ထားပါ
၇က္ေပါင္း (၁၈၀) ျပည့္ရင္ ေနာက္တခါ KMS Activator ေလးကို ထပ္ျပီး RUN ေပးလိုက္ပါ
အားလုံးအဆင္ေျပသြားမွာပါ
ဖိုင္ဆိုက္က ၾကီးေတာ့200MB ဆီ  7 -ဖိုင္ခြဲျပီး တင္ထားေပးပါတယ္ 
<<<Download Link>>>
                  http://www.mediafire.com/?ddgs6h9c994sh


<<<<<အားလုံးအဆင္ေျပသြားမွာပါ>>>>>


Wednesday, October 24, 2012

Microsoft Office 2010 KMS Activator

အသိပညာ မ်ားကို လက္ဆင့္ကမ္းမွ်ေ၀ ေပးျခင္းျဖစ္ ဒါနျပဳပါရေစ။
ဒီေကာင္ေလးကို မဖြင့္ခင္ antivirus ကို disable ခဏလုပ္ထားပါ
Microsoft Office 2010 program ကို ပိတ္ထားပါ
(၁)KMS  Activator ကို Run လိုက္ပါ။ေအာက္ပါပုံအတိုင္းေပၚလာရင္  

(၂)Activate Office 2010 and Install KMS Activator မွာ ကလစ္ပါ။
ေအာက္ပါပုံအတိုင္းေပၚလာတဲ့အခါ Yes ကို ကလစ္ေပးပါ

ေအာက္ပါပံုအတိုင္းေပၚလာရင္ enter ေခါက္ေပးလိုက္ပါ
ရက္ေပါင္း၁၈၀ျပည့္သြားတဲ့အခါ ဒီေကာင္ေလးကိုဘဲ ေနာက္တၾကိမ္ ျပန္ျပီး Run ေပးလိုက္ပါ
အားလုံးအဆင္ေျပၾကပါေစ
Password>>>>>phochithtwe@gmail.com

Download Link<<<<http://www.mediafire.com/


Internet Download Manager 6.12 Build 22 Final Full version

အသိပညာ မ်ားကို လက္ဆင့္ကမ္းမွ်ေ၀ ေပးျခင္းျဖစ္ ဒါနျပဳပါရေစ။
http://technojourney.com/wp-content/uploads/2012/08/IDM-6.11-serial-free-download.jpg


Internet Download Manager ကို Next အဆင့္ဆင့္ နဲ႔ Install လိုက္ပါ....
Key ေတြေတာင္းေနရင္ Cancle (သို႔မဟုတ္) ပိတ္ပစ္လိုက္ပါ...။

ကြန္ျပဴတာရဲ႕ ညာဘက္ေထာင့္ ေအာက္နားက Taskbar က trayicon ထဲမွာ
Run ေနလားအရင္ဆံုးၾကည့္ပါ Run ေနရင္ Right Click 
နဲ႔ Exit အရင္ဆံုးေပးလိုက္ပါ...။

Antivirus ကို Disable ခဏလုပ္ထားပါ
UniPatch 2.7.exe ကို Double Click နဲ႔ Run လိုက္ပါ..။
ခဏေနလို႔ box ေလးတခု ေပၚလာရင္ Patch ကို ႏွိပ္ပါ ေနာက္
ထပ္ေပၚလာတဲ႔ အကြက္ေလးမွာ ကိုယ့္နာမည္ျဖစ္ေစ ၾကိဳက္တာ
ေရးထည့္ေပးျပီး OK ကိုႏွိပ္လိုက္ပါ .. ဒါဆိုရင္ IDM ကိုအျမဲသံုးလို႔
ရသြားပါျပီ.....။

                     (ေနာက္တခါ IDM ကို သံုးမရျဖစ္ရင္ Key ေတြေတာင္းေနရင္
                           Register လုပ္ခိုင္ေနရင္ ခုတိုင္းပဲ လုပ္ေပးလိုက္ပါ...
                      အေရးၾကီးတာက ဒီ Patch ဖိုင္လ္ေလး ကိုအသံုးမျပဳခင္
                               IDM ကို Exit ေပးထားဖို႔လိုပါတယ္)
                            

                                ==== အားလံုးအဆင္ေျပၾကပါေစ ====

INSTRUCTIONS

1) Install Internet Download Manager any version (Latest version - recommended)
   http://www.internetdownloadmanager.com
2)Disable Antivirus
3) Run the Patch (from any directory)

4) Click on "Patch" button

5) Enter your full name (any name)


Enjoy !
 Download Link<<<<http://www.mediafire.com/

password<<<phochithtwe@gmail.com

CCleaner 2012 Professional v3.19.1721 Final Full version

အသိပညာ မ်ားကို လက္ဆင့္ကမ္းမွ်ေ၀ ေပးျခင္းျဖစ္ ဒါနျပဳပါရေစ။
Install Now ဆိုတာကိုသာ ကလစ္ေပးလိုက္ပါ Full Version ျဖစ္သြားပါလိမ့္မယ္
ကြန္ျပဴတာကို စဖြင့္ဖြင့္ျခင္း တစ္ခါ ပိတ္ခါနီး တစ္ခါ ဒီေကာင္ေလးကို Run ေပးလိုက္ပါ

instruction


.exe File Format (Setup Full Version)
You now have a much easier installation
Run Application
Click on "Install Now" For Install Software Full Version
Enjoy


ေဒါင္းလို႔ဒ္လင့္ခ္<<<http://www.filefactory.com/
                         http://www.mediafire.com/

Tuesday, October 23, 2012

Cyberlink PowerDVD Ultra 12

အသိပညာ မ်ားကို လက္ဆင့္ကမ္းမွ်ေ၀ ေပးျခင္းျဖစ္ ဒါနျပဳပါရေစ။
 ေနာက္ဆုံးထြက္ Cyberlink PowerDVD 12 ေလးပါ လို၇င္ေဒါင္းထားၾကေပါ့ဗ်ာ
ေဒါင္းလို႔ဒ္လင့္ခ္>>>>>>part-1 + 2>>>>http://www.mediafire.com/
                    
password<<<<phochithtwe@gmail.com

Monday, October 22, 2012

Adobe Premiere Pro CS 6 Full Free Download

အသိပညာ မ်ားကို လက္ဆင့္ကမ္းမွ်ေ၀ ေပးျခင္းျဖစ္ ဒါနျပဳပါရေစ။
 Video Editing အတြက္ အေကာင္းဆုံး ေဆာ့ဖ္၀ဲ ေလးျဖစ္ပါတယ္ 64bit OS မွသာ အင္စေတာလုပ္လို႔ရပါမွာ ျဖစ္ပါတယ္ setup file ကို  Try အေနနဲ႔ အင္စေတာ လုပ္ပါ

ျပီးရင္ Crack Folder ကိုဖြင့္ျပီး amtlib.dll ဖိုင္ကို ေကာ္ပီကူးျပီး C:/program file>>adobe>>>Adobe Premiere Pro CS6 ဖိုဒါ ထဲမွာ paste လုပ္ေပးလိုက္ရင္ အဆင္ေျပသြားမွာျဖစ္ပါတယ္။ လိုခ်င္ရင္ေတာ့ေအာက္လင့္ခ္မွာ ေဒါင္းေပေတာ့ ဗိ်ဳ႕ ဖိုင္ကို  ၇ ပိုင္းခြဲျပီးတင္ထားေပးပါတယ္ crack file ကို password ေပးထားတဲ့အတြက္ password ကိုေကာ္ပီကူးျပီးထည့္ေပးလိုက္ပါ


System requirements

Windows

  • Intel® Core™2 Duo or AMD Phenom® II processor; 64-bit support required
  • Microsoft® Windows® 7 with Service Pack 1 (64 bit)
  • 4GB of RAM (8GB recommended)
  • 4GB of available hard-disk space for installation; additional free space required during installation (cannot install on removable flash storage devices)
  • Additional disk space required for preview files and other working files (10GB recommended)
  • 1280x900 display
  • OpenGL 2.0–capable system
  • 7200 RPM hard drive (multiple fast disk drives, preferably RAID 0 configured, recommended)
  • Sound card compatible with ASIO protocol or Microsoft Windows Driver Model
  • DVD-ROM drive compatible with dual-layer DVDs (DVD+-R burner for burning DVDs; Blu-ray burner for creating Blu-ray Disc media)
  • QuickTime 7.6.6 software required for QuickTime features
  • Optional: Adobe-certified GPU card for GPU-accelerated performance
  • This software will not operate without activation. Broadband Internet connection and registration are required for software activation, validation of subscriptions, and access to online services.* Phone activation is not available.

Mac OS

  • Multicore Intel processor with 64-bit support
  • Mac OS X v10.6.8 or v10.7. Adobe Creative Suite 5, 5.5, and CS6 applications support Mac OS X Mountain Lion (v10.8) when installed on Intel based systems.*
  • 4GB of RAM (8GB recommended)
  • 4GB of available hard-disk space for installation; additional free space required during installation (cannot install on a volume that uses a case-sensitive file system or on removable flash storage devices)
  • Additional disk space required for preview files and other working files (10GB recommended)
  • 1280x900 display
  • 7200 RPM hard drive (multiple fast disk drives, preferably RAID 0 configured, recommended)
  • OpenGL 2.0–capable system
  • DVD-ROM drive compatible with dual-layer DVDs (SuperDrive for burning DVDs; Blu-ray burner for creating Blu-ray Disc media)
  • QuickTime 7.6.6 software required for QuickTime features
  • Optional: Adobe-certified GPU card for GPU-accelerated performance
  • This software will not operate without activation. Broadband Internet connection and registration are required for software activation, validation of subscriptions, and access to online services.* Phone activation is not available.
*Learn more about Mac OS X Mountain Lion support.

Supported AMD graphics cards for GPU acceleration

  • AMD Radeon HD 6750M (only on certain MacBook Pro computers running OS X Lion (10.7.x) with a minimum of 1GB VRAM)
  • AMD Radeon HD 6770M (only on certain MacBook Pro computers running OS X Lion (10.7.x) with a minimum of 1GB VRAM)

Supported NVIDIA graphics cards for GPU acceleration

  • GeForce GTX 285 (Windows and Mac OS)
  • GeForce GTX 470 (Windows)
  • GeForce GTX 570 (Windows)
  • GeForce GTX 580 (Windows)
  • NVIDIA® Tesla C2075 card (Windows) when paired with a Quadro card as part of an NVIDIA Maximus™ configuration
  • Quadro FX 3700M (Windows)
  • Quadro FX 3800 (Windows)
  • Quadro FX 3800M (Windows)
  • Quadro FX 4800 (Windows and Mac OS)
  • Quadro FX 5800 (Windows)
  • Quadro 2000 (Windows)
  • Quadro 2000D (Windows)
  • Quadro 2000M (Windows)
  • Quadro 3000M (Windows)
  • Quadro 4000 (Windows and Mac OS)
  • Quadro 4000M (Windows)
  • Quadro 5000 (Windows)
  • Quadro 5000M (Windows)
  • Quadro 5010M (Windows)
  • Quadro 6000 (Windows)
  • Quadro CX (Windows)
  • Tesla C2075** (Windows)
Visit the NVIDIA website for system requirements and compatibility. The list of graphics cards that are compatible with Adobe® Premiere® Pro CS6 is updated on a regular basis.

* This product may integrate with or allow access to certain Adobe or third-party hosted online services ("Online Services"). Online Services are available only to users 13 and older and require agreement to additional terms of use and Adobe's online privacy policy. Online Services are not available in all countries or languages, may require user registration, and may be discontinued or modified in whole or in part without notice. Additional fees or subscription charges may apply.


** When paired with a Quadro card as part of NVIDIA Maximus configured system.
ေဒါင္းလို႔ဒ္လင့္ခ္(download link)>>>>>>>part-01
                                                                     >>part-02
                                                                     >>part-03
                                                                     >>part-04
                                                                     >>part-05
                                                                     >>part-06
                                                                     >>part-07
Crack File Download <<<<http://www.mediafire.com/?ei7w4ckb941o4nj
ဝဝဝဝဝဝဝဝDownload,,,,,,,,,Here  ,,,,,,,,,,,,
password>>>>>>>phothaaung.blogspot.com

Windows-8-RTM Build 9200

အသိပညာ မ်ားကို လက္ဆင့္ကမ္းမွ်ေ၀ ေပးျခင္းျဖစ္ ဒါနျပဳပါရေစ။
screenshot (1)


screenshot(2)
Windows-8-RTM Build 9200/32bit&64bit 90days trial
လိုခ်င္ရင္ေအာက္မွာေဒါင္းနိုင္ပါတယ္ activated လုပ္ဖို႔အတြက္ windows 8 Activator post မွာ ၀င္ျပီးေဒါင္းနိုင္ပါတယ္
ေဒါင္းလို႔လင္ခ္(Download Link)<<<<windows-8-RTM Build 9200/32bit&64bit>>>>

Sunday, October 21, 2012

WINDOWS 8 ACTIVATOT

အသိပညာ မ်ားကို လက္ဆင့္ကမ္းမွ်ေ၀ ေပးျခင္းျဖစ္ ဒါနျပဳပါရေစ။


windows 8 activator ေလးပါ 
windows 8 ကို full version အျဖစ္သုံးခ်င္တယ္ဆိုရင္ေတာ့ ဒီေကာင္ေလးကို ေဒါင္းျပီး အင္စေတာ သာ လုပ္ေပးလိုက္ အဆင္ေျပသြားပါလိမ့္မယ္
ဒီဖိုင္ကို right ကလစ္နိွပ္ျပီး run as administrator နဲ႔ ဖြင့္လိုက္ပါ
windows 8 install/uninstall ကိုနိွပ္ေပးလိုက္ရင္ cmd လို ေဘာက္စ္ေလးေပၚလာမယ္
အဲဒီမွာ y ကိုနိွပ္ျပီး enter ေခါက္လိုက္ပါ
သူ႔အလိုလို restart က်သြားပါလိမ့္မယ္
activated မလုပ္ခင္္ ဖိုင္ကို အရင္ save လုပ္ထားပါ
ဖိုင္ေဒါင္းရန္

ဖိုင္ျဖည္တဲ့ အခါ password ေတာင္းပါလိမ့္မယ္
password<<<phothaaung.blogspot.com>>>


video tutorial ကို ဒီလင့္ခ္မွာ ၀င္ၾကည့္လို႔ရပါတယ္
အားလုံးအဆင္ေျပၾကပါေစ

Chrome မွာ ZawGyi မေပၚတဲ့ျပႆနာ

အသိပညာ မ်ားကို လက္ဆင့္ကမ္းမွ်ေ၀ ေပးျခင္းျဖစ္ ဒါနျပဳပါရေစ။
FontTagger ကိုထည့္ေပးလိုက္ရင္ အားလုံးအဆင္ေျပသြားမွာျဖစ္ပါတယ္ အရင္ဆုံး>>ဒီေနရာ Chrome WebStoreကို၀င္လိုက္ပါ။ျပီးရင္ Added To Chrome ဆိုတာေလးကိုကလစ္ေပးလိုက္ပါ။

ဒါဆိုရင္ေအာက္ကပုံ အတိုင္း chrome ရဲ့ ညာဖက္ေထာင့္မွာ icon ေလးေပၚလာတာကိုေတြ႔ရမွာျဖစ္ပါတယ္။ဒါဆိုရင္ အဆင္ေျပသြားပါျပီ။
chrome ရဲ့ setting ထဲက customize fonts ေနရာမွာ zawgyi one ကို အကုန္လုံးေျပာင္းထားဖို႔ေတာ့လိုတယ္။
chrome ရဲ့ settings>>>>show advanced settings>>>>customize fonts >>>ကို၀င္ျပီးေတာ့ အထက္ပါအတိုင္း zawgyi-one ကိုေျပာင္းျပီး ok ကိုနိွပ္ေပးလိုက္ရင္ အားလုံးအဆင္ေျပသြားမွာျဖစ္ပါတယ္
က်ေနာ္လဲ အရင္က ဒီလိုျဖစ္ဖူးပါတယ္ ကိုေနမင္းေမာင္ <<ဆိုဒ္>>မွာေတြ႔လို႔ လုပ္ၾကည့္လိုက္တာ အဆင္ေျပသြားပါတယ္ ဒါေၾကာင့္ မသိေသးတဲ့ သူေတြအတြက္ ျပန္ျပီး ရွယ္ေပးလိုက္ပါတယ္
အဆင္ေျပၾကပါေစ